BPA-free reusable canning lids??
Does anybody out there have experience with these?
Tattler Reusable Canning Lids
--
Labels: food preservation
posted by e4 @ 3/14/2010 07:31:00 PM
2
comments
![]()
A chronicle of my ongoing adventures in parenting, gardening, farming, and technology.
Does anybody out there have experience with these?
Labels: food preservation
posted by e4 @ 3/14/2010 07:31:00 PM
2
comments
![]()
Okay, since this keeps coming up, I thought I'd explain how we converted an old chest freezer into an amazingly efficient refrigerator. Now just to be clear, this was not my idea originally. I can take zero credit for any part of this concept. I'm just following in the footsteps of smarter people than me. The original concept came from here, and honestly, I've lost track of where I heard the suggestion for using the homebrewing thermostat instead of doing the wiring yourself.
 As you can probably tell, it's in our basement. The basement air will always be cooler, giving this little guy less work to do. It's also in close proximity to the area that we hope will become a root cellar, which, if we can enclose it and give it an outside air vent, will give the chest fridge almost no work to do. At least in the cooler months. (And if you look closely, you'll see our worm bin off to the side.)
 (this photo borrowed from HopTech)


Labels: conservation, food preservation, projects
posted by e4 @ 12/19/2007 09:00:00 PM
2
comments
![]()
 Well, the funky old/new cider press hit a few snags. Or rather, I hit a few snags. See those long, thin bolts on either side? Well, let's just say that cast iron can be surprisingly brittle. While removing it from its somewhat flimsy shipping box, I broke one of those bolts. Or perhaps it broke in transit, I'm not sure. It sheared off right where it screws into the top piece. I used my best powers of persuasion and limited handyman skills to try to extract the broken piece, then to drill it out. It wasn't working. In the process, I broke off the head of a little thumb screw too.
 So the other night, with a non-broken press and a bag of Braeburn apples, e5 and I decided to give it a whirl. Or a crank.
 Success! Amber liquid began flowing from the press. Turning the crank as far as I could and then waiting a couple minutes seemed to allow further pressing.
 I found some happy consumers out in the pasture.
 (Oddly, the donkey had no interest.)
Labels: food, food preservation, homestead
posted by e4 @ 3/30/2007 09:48:00 AM
2
comments
![]()
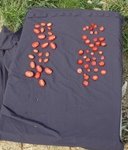
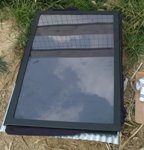
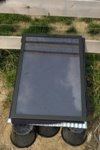 Well, that crazy contraption actually worked. When I was putting it together, I felt like I should have been making a video of it, which would then be sped up and dubbed with some kooky music.
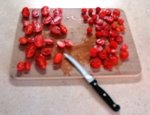
Lovely sun-dried tomatoes. They taste like concentrated fresh tomato. The ones that were cut lengthwise didn't fare as well, or at least they need some more time. That makes sense though, since they've got more water to lose. I think I'll slice them the usual way next time though.
Labels: dehydrating, food preservation, homestead
posted by e4 @ 10/14/2006 11:14:00 PM
2
comments
![]()


Labels: dehydrating, food preservation, homestead
posted by e4 @ 10/10/2006 03:32:00 PM
2
comments
![]()


